Modifier, hacker et coudre une brassière triangle
{:fr}
L’avantage d’une brassière triangle, c’est que ça se modifie / pirate / hacke très facilement…
Après mon 1er essai très concluant de la brassière triangle Bohème d’Étoffe Malicieuse, j’ai décidé d’en faire une version radicalement différente pour répondre à la semaine 3 du défi #inspirejulychallenge : « Cut-outs »
Traduction de cut-outs ? Trous. XD
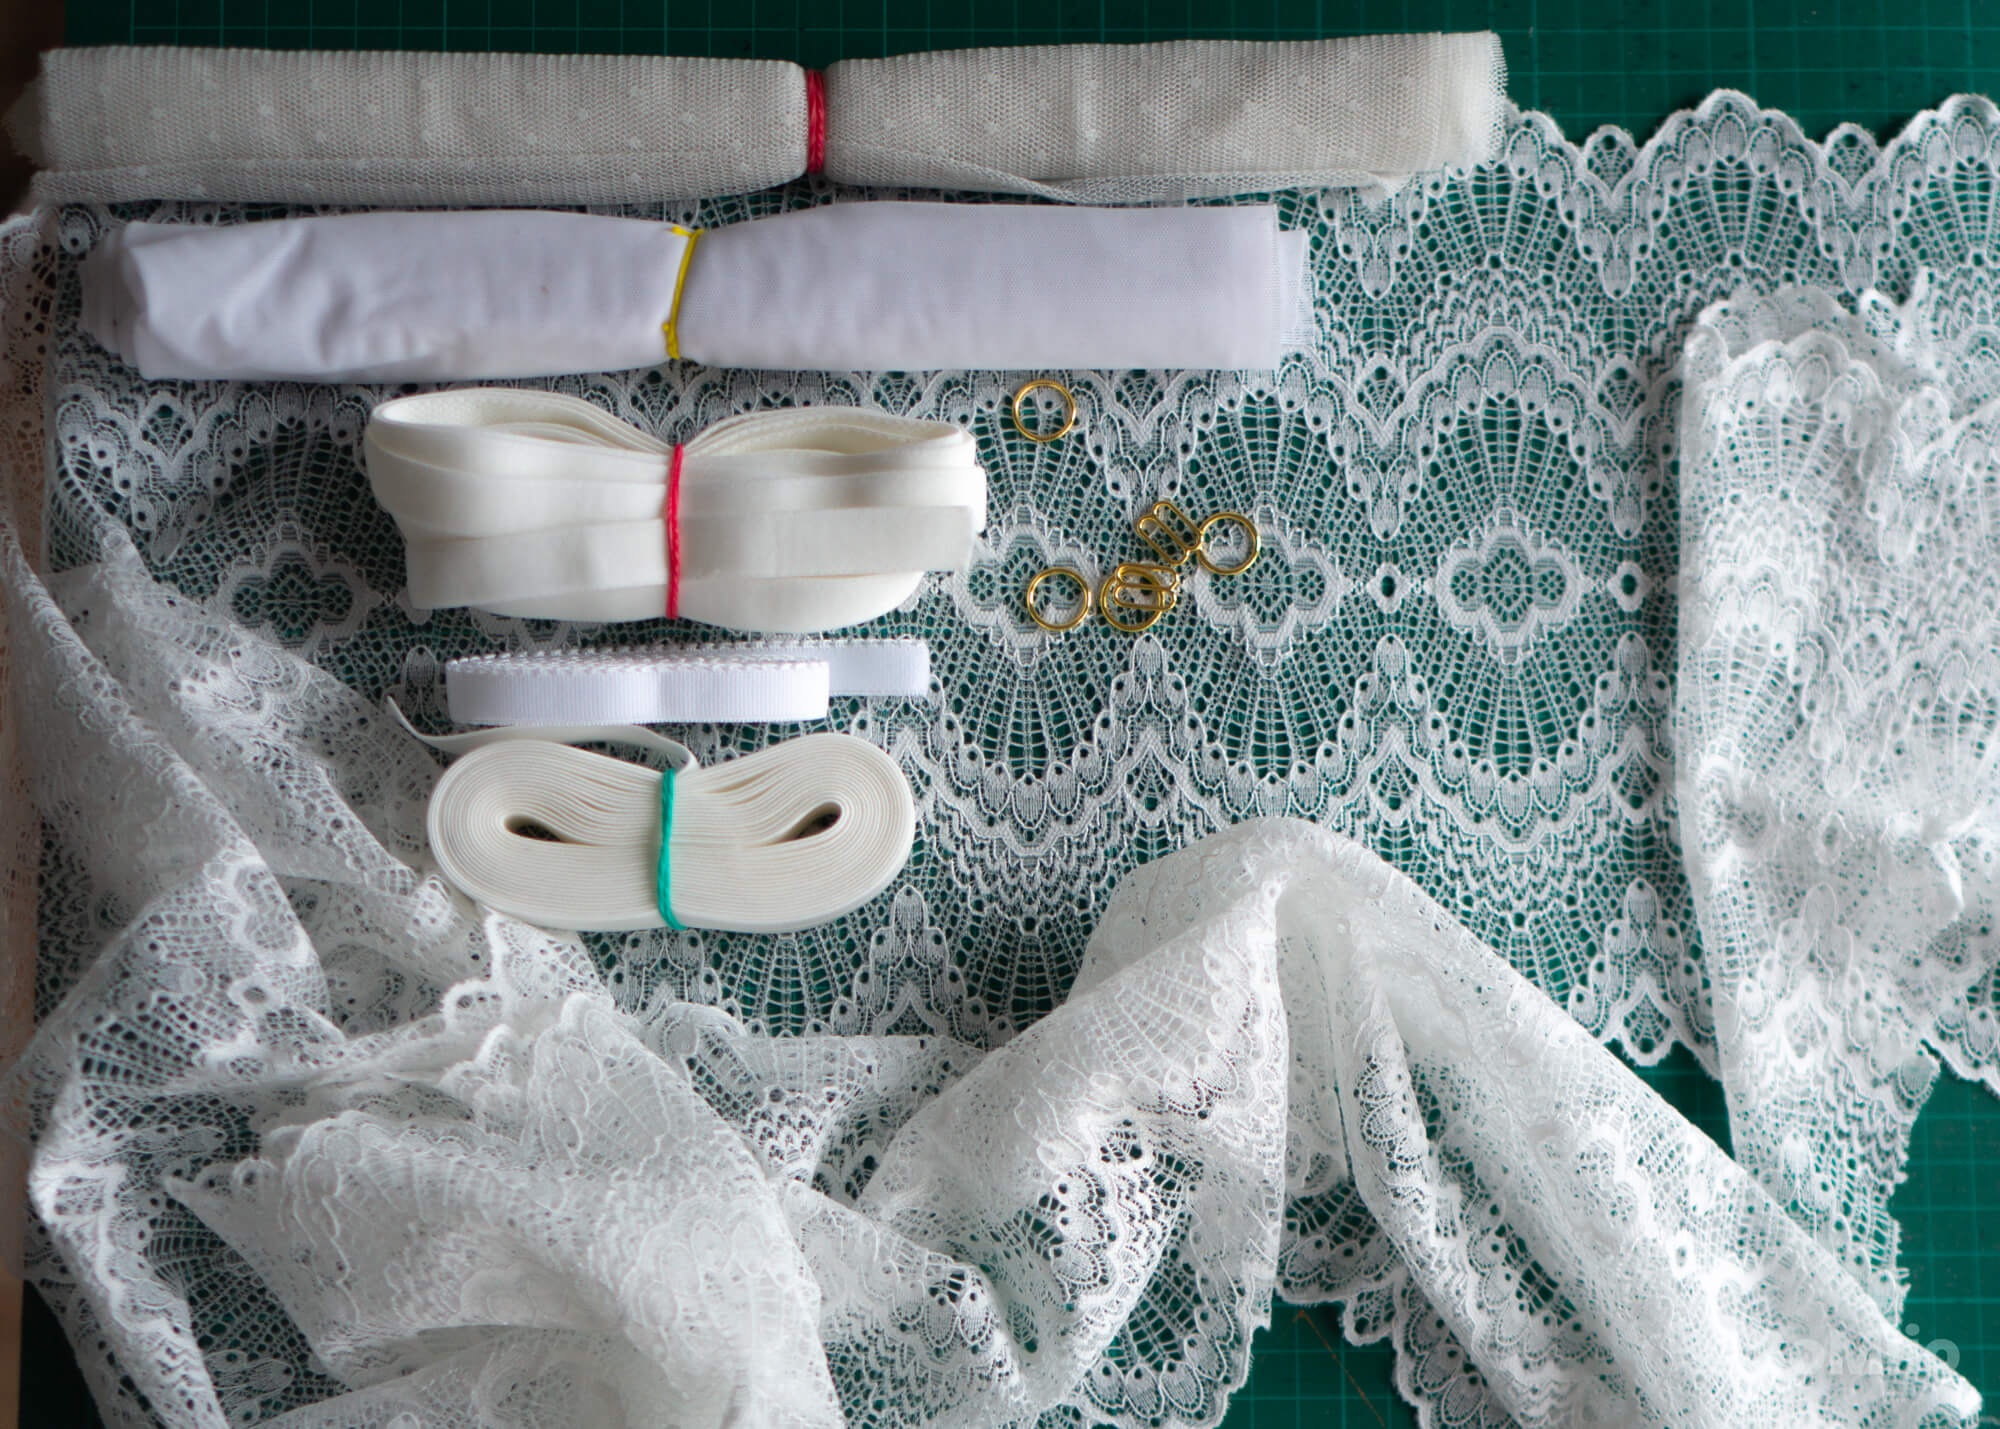
| ITEM | BOUTIQUE | QUANTITÉ | PRIX |
| Patron de la brassière Bohème | Étoffe Malicieuse | 1 | 0 € |
| Résille à pois crème | ? | 0,3 m | ? |
| Powernet blanc | Mercerie Extra | 0,4 m | 2 € |
| Élastique à bretelles large | Réserve des Arts | 1 m | 0,5 € |
| Élastique pré-plié | Réserve des Arts | 3 m | 1 € |
| Anneaux & réglettes | Aliexpress | 1 m | 0,6 € |
| Élastique à bande | Evie La Luve | 1 m | 0,5 € |
| Dentelle stretch crème | Evie La Luve | 0,7 m | 1,50 € |
| Fil & fil mousse | Stock | 0 | 0 € |
| Total | 6,10 € |
Modifier le patron de la brassière triangle
La brassière Bohème est une brassière triangle qui est, à ce jour, le modèle qui me va le mieux. Je l’ai donc naturellement pris pour base de mon piratage.

Il fallait que ça sorte. Désolée.
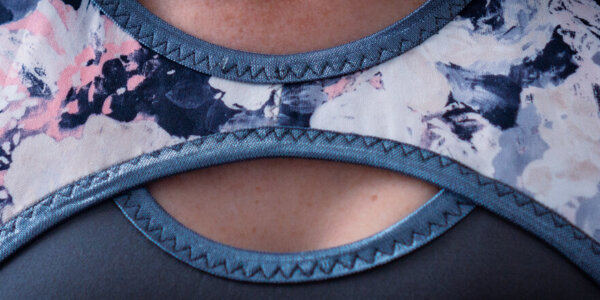
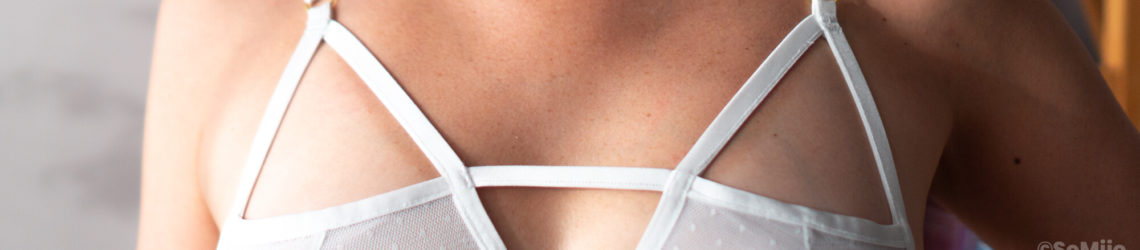
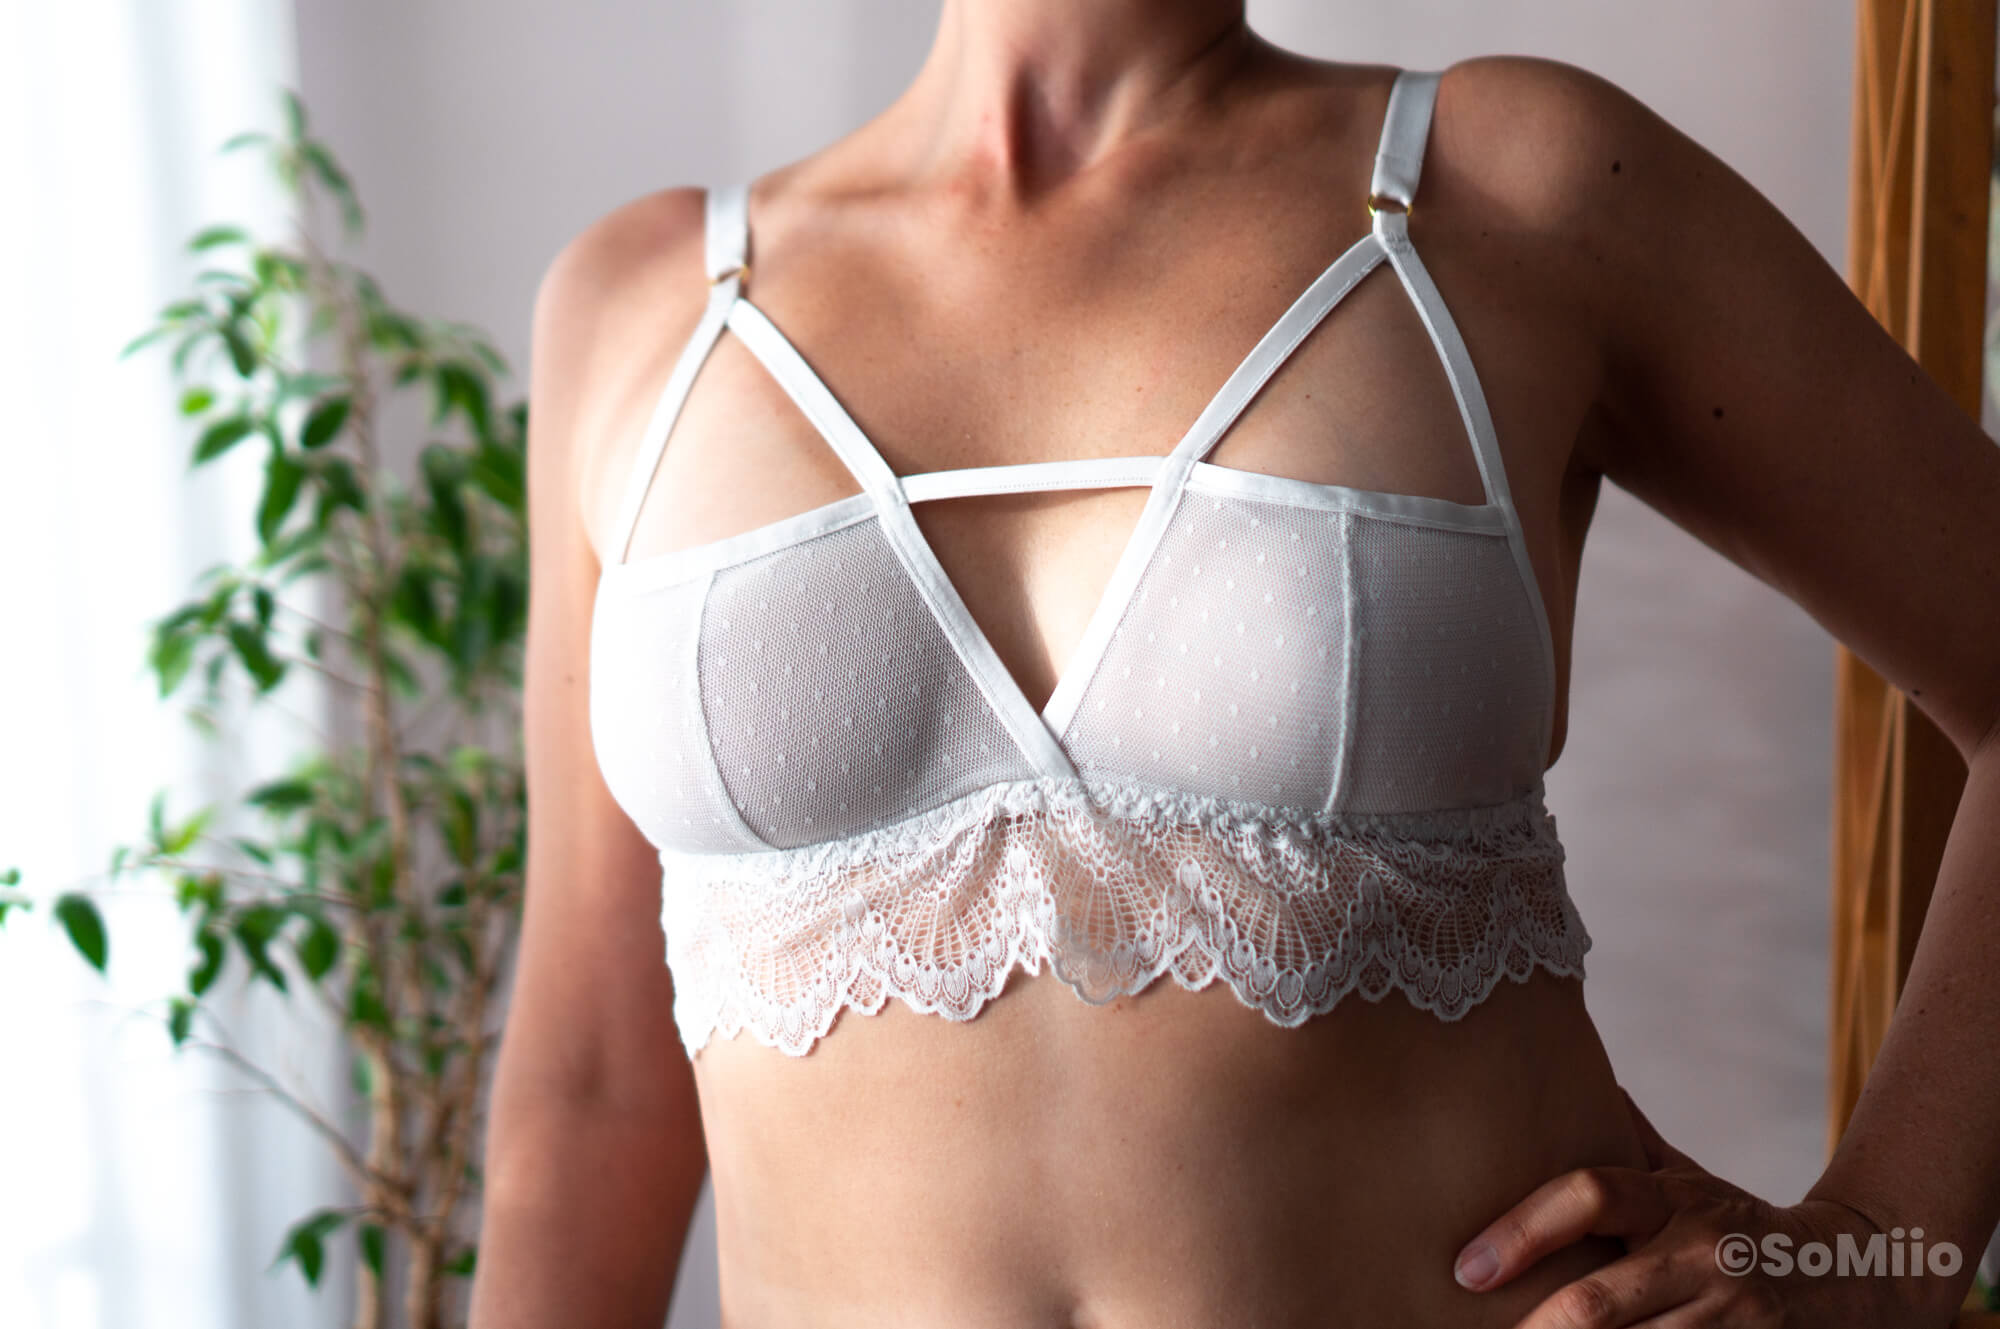
L’idée était d’ouvrir les bonnets pour laisser la partie supérieure ouverte avec un petit effet géométrique et strappy.
Le blanc, c’est pour éviter un effet bondage SM.

Tout d’abord, pour modifier proprement le patron, j’ai recollé le haut des 2 parties du bonnet ensemble avec du scotch papier qui tient pas trop (oui, cette formule est super longue). Du masking tape donc.
Attention à bien superposer les lignes de coutures en faisant abstraction des marges de coutures.
Ici, les patrons d’Étoffe Malicieuse sont bien pratiques puisque les lignes de marges de couture sont imprimables.
Ensuite, couic, tu découpes et c’est parti pour couper les pièces dans le tissu.
Coudre la brassière modifiée
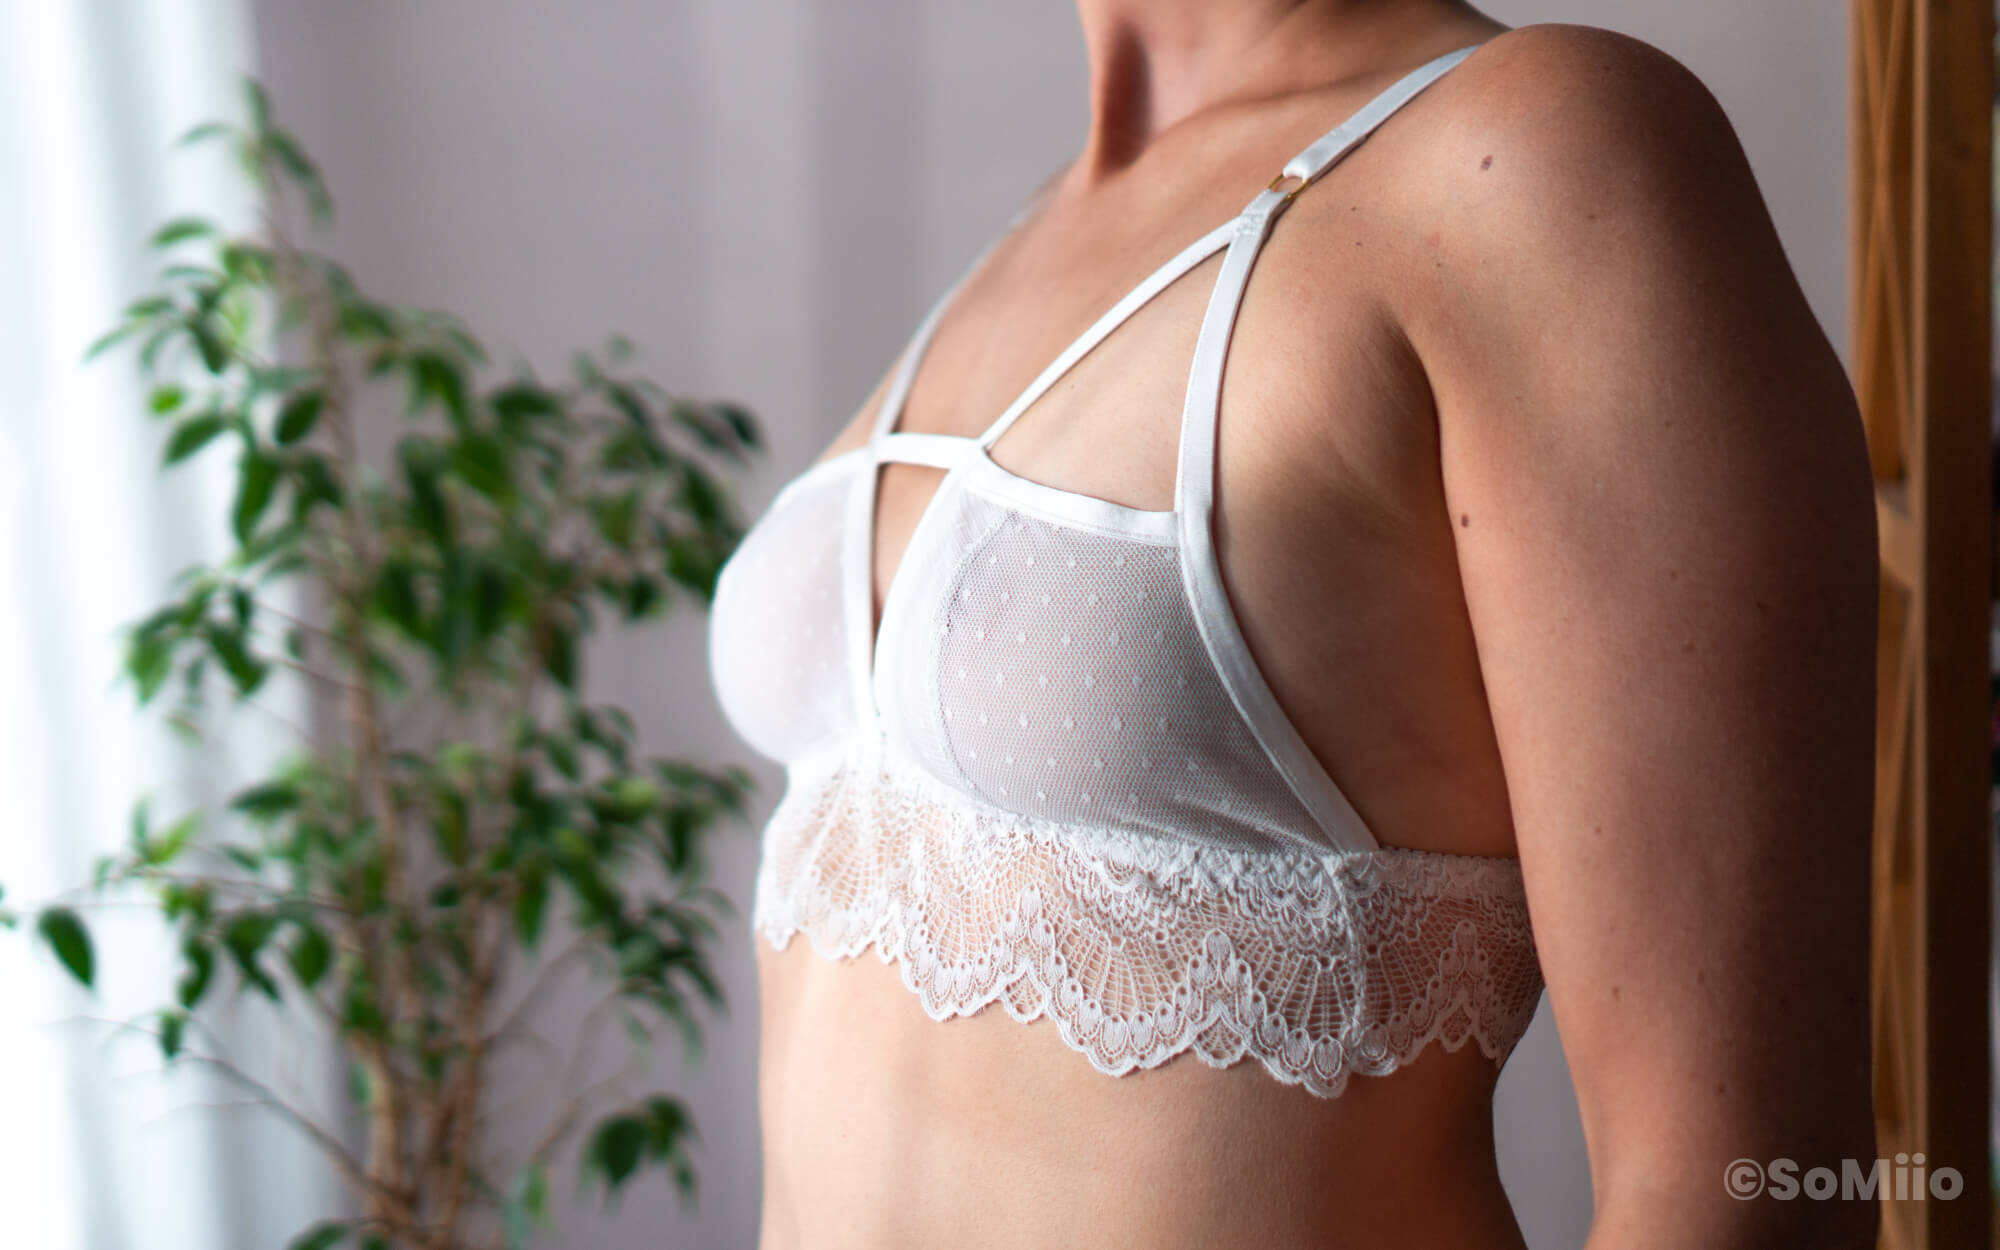
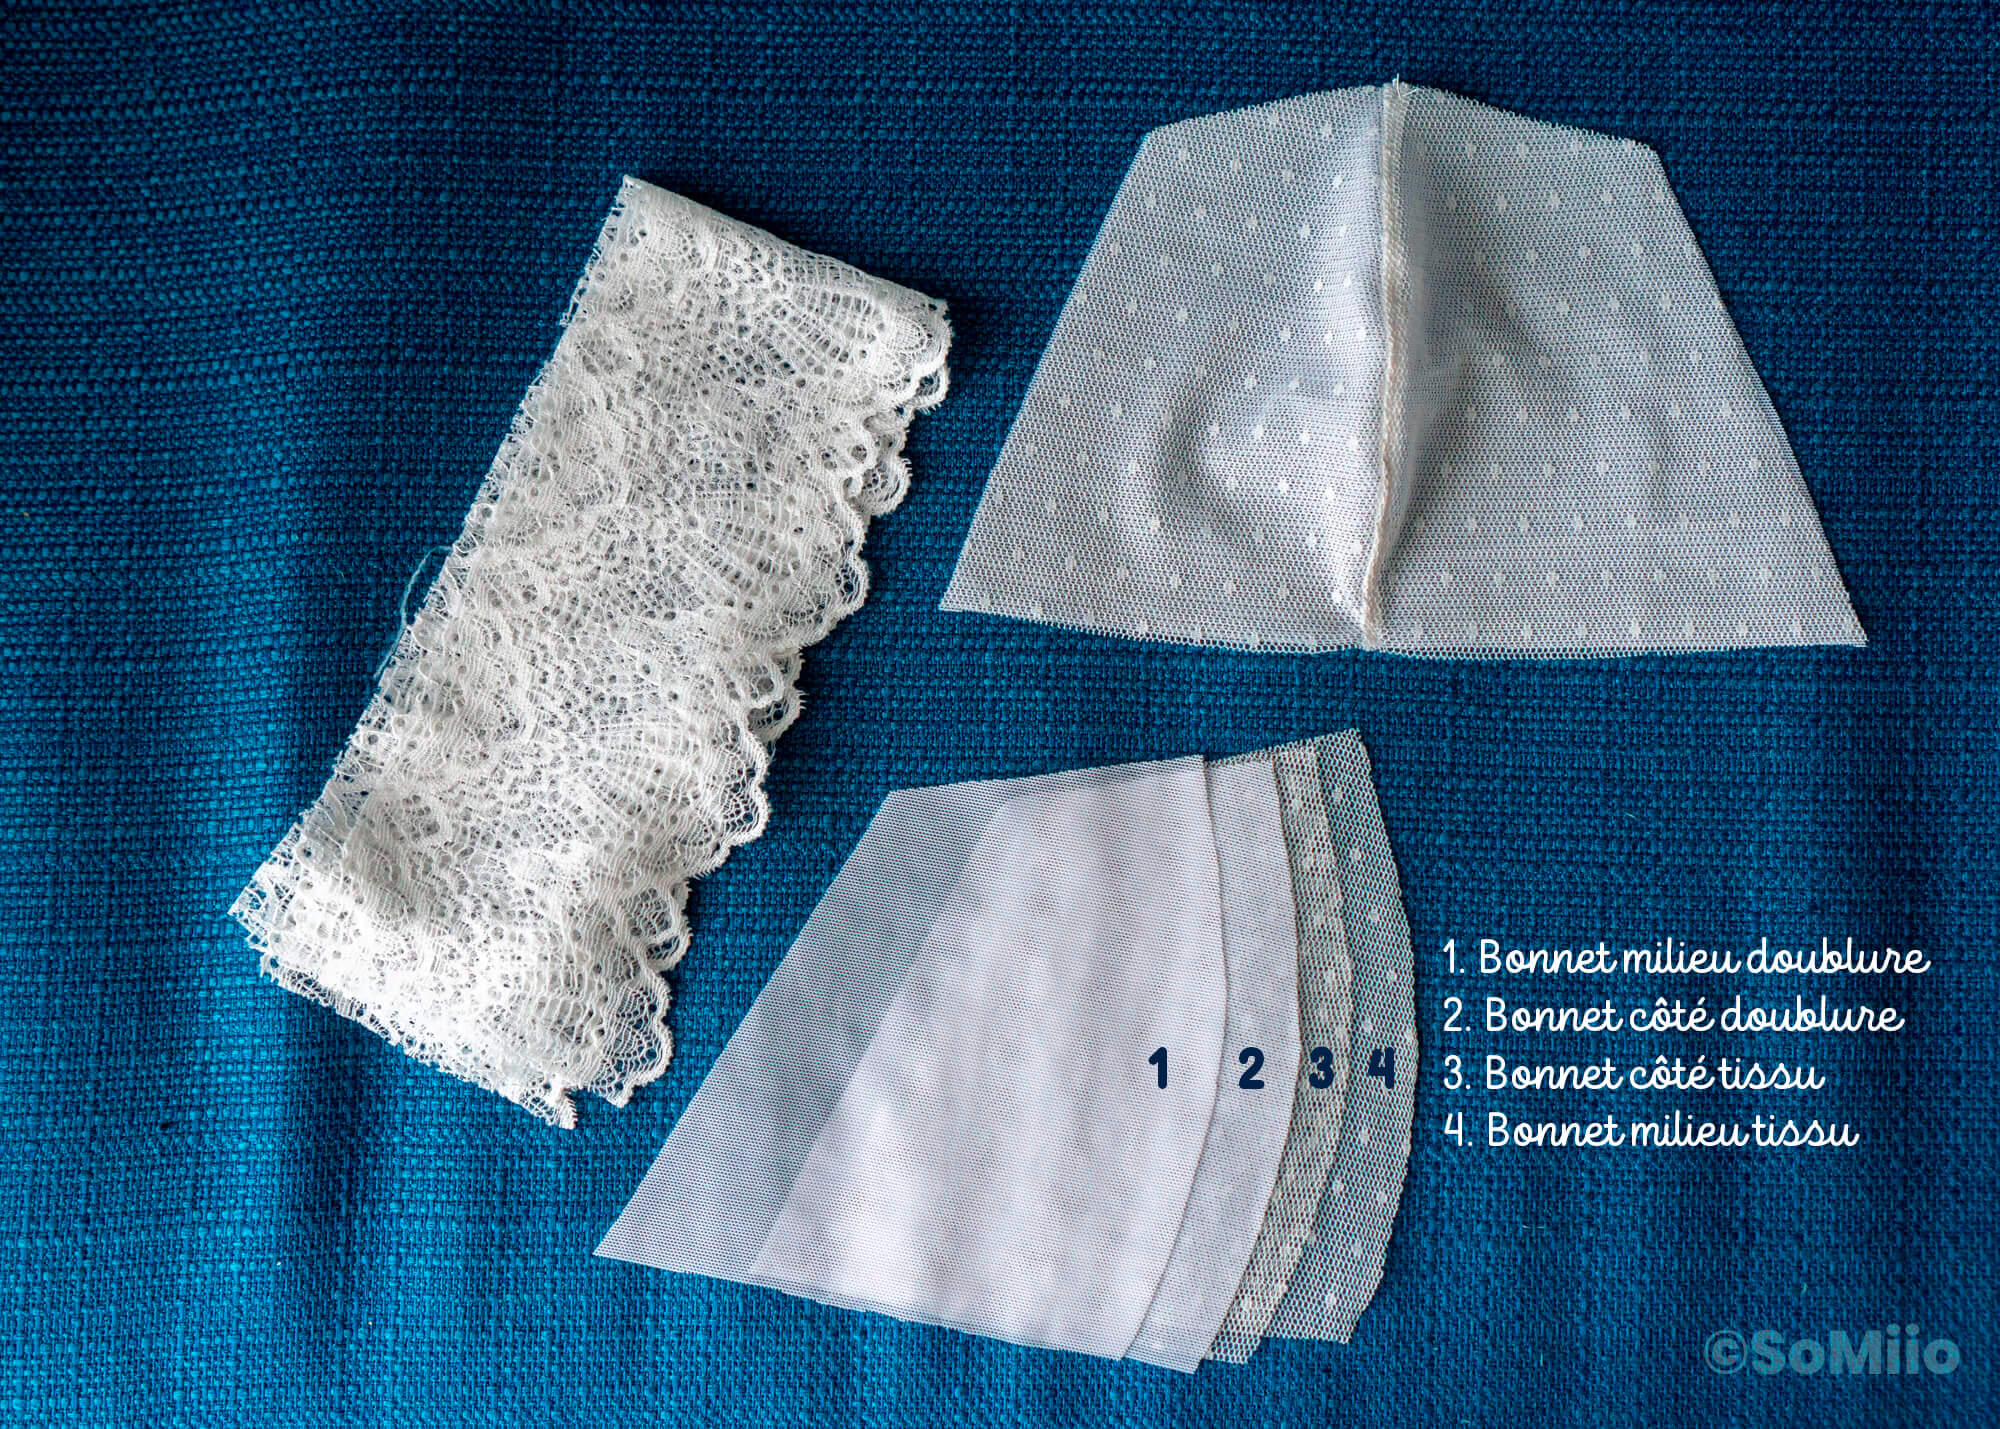
Nous avons donc ceci en terme de pièces :
- une bande du bas (décorative) en dentelle stretch
- 4 côtés de bonnets : 2 en résille à pois, 2 en powernet
- 4 milieux de bonnets : 2 en résille à pois, 2 en powernet
J’ai noté sur la photo l’ordre d’empilement des pièces pour obtenir une couture cachée, ou couture enclose. #lescouturescachéescestmapassion
Si tu les couds dans cette ordre là, tu ouvres et tadaaa ! La couture sera cachée au milieu du bazard et ta délicate peau sauvée des gratouillis. Ouf.
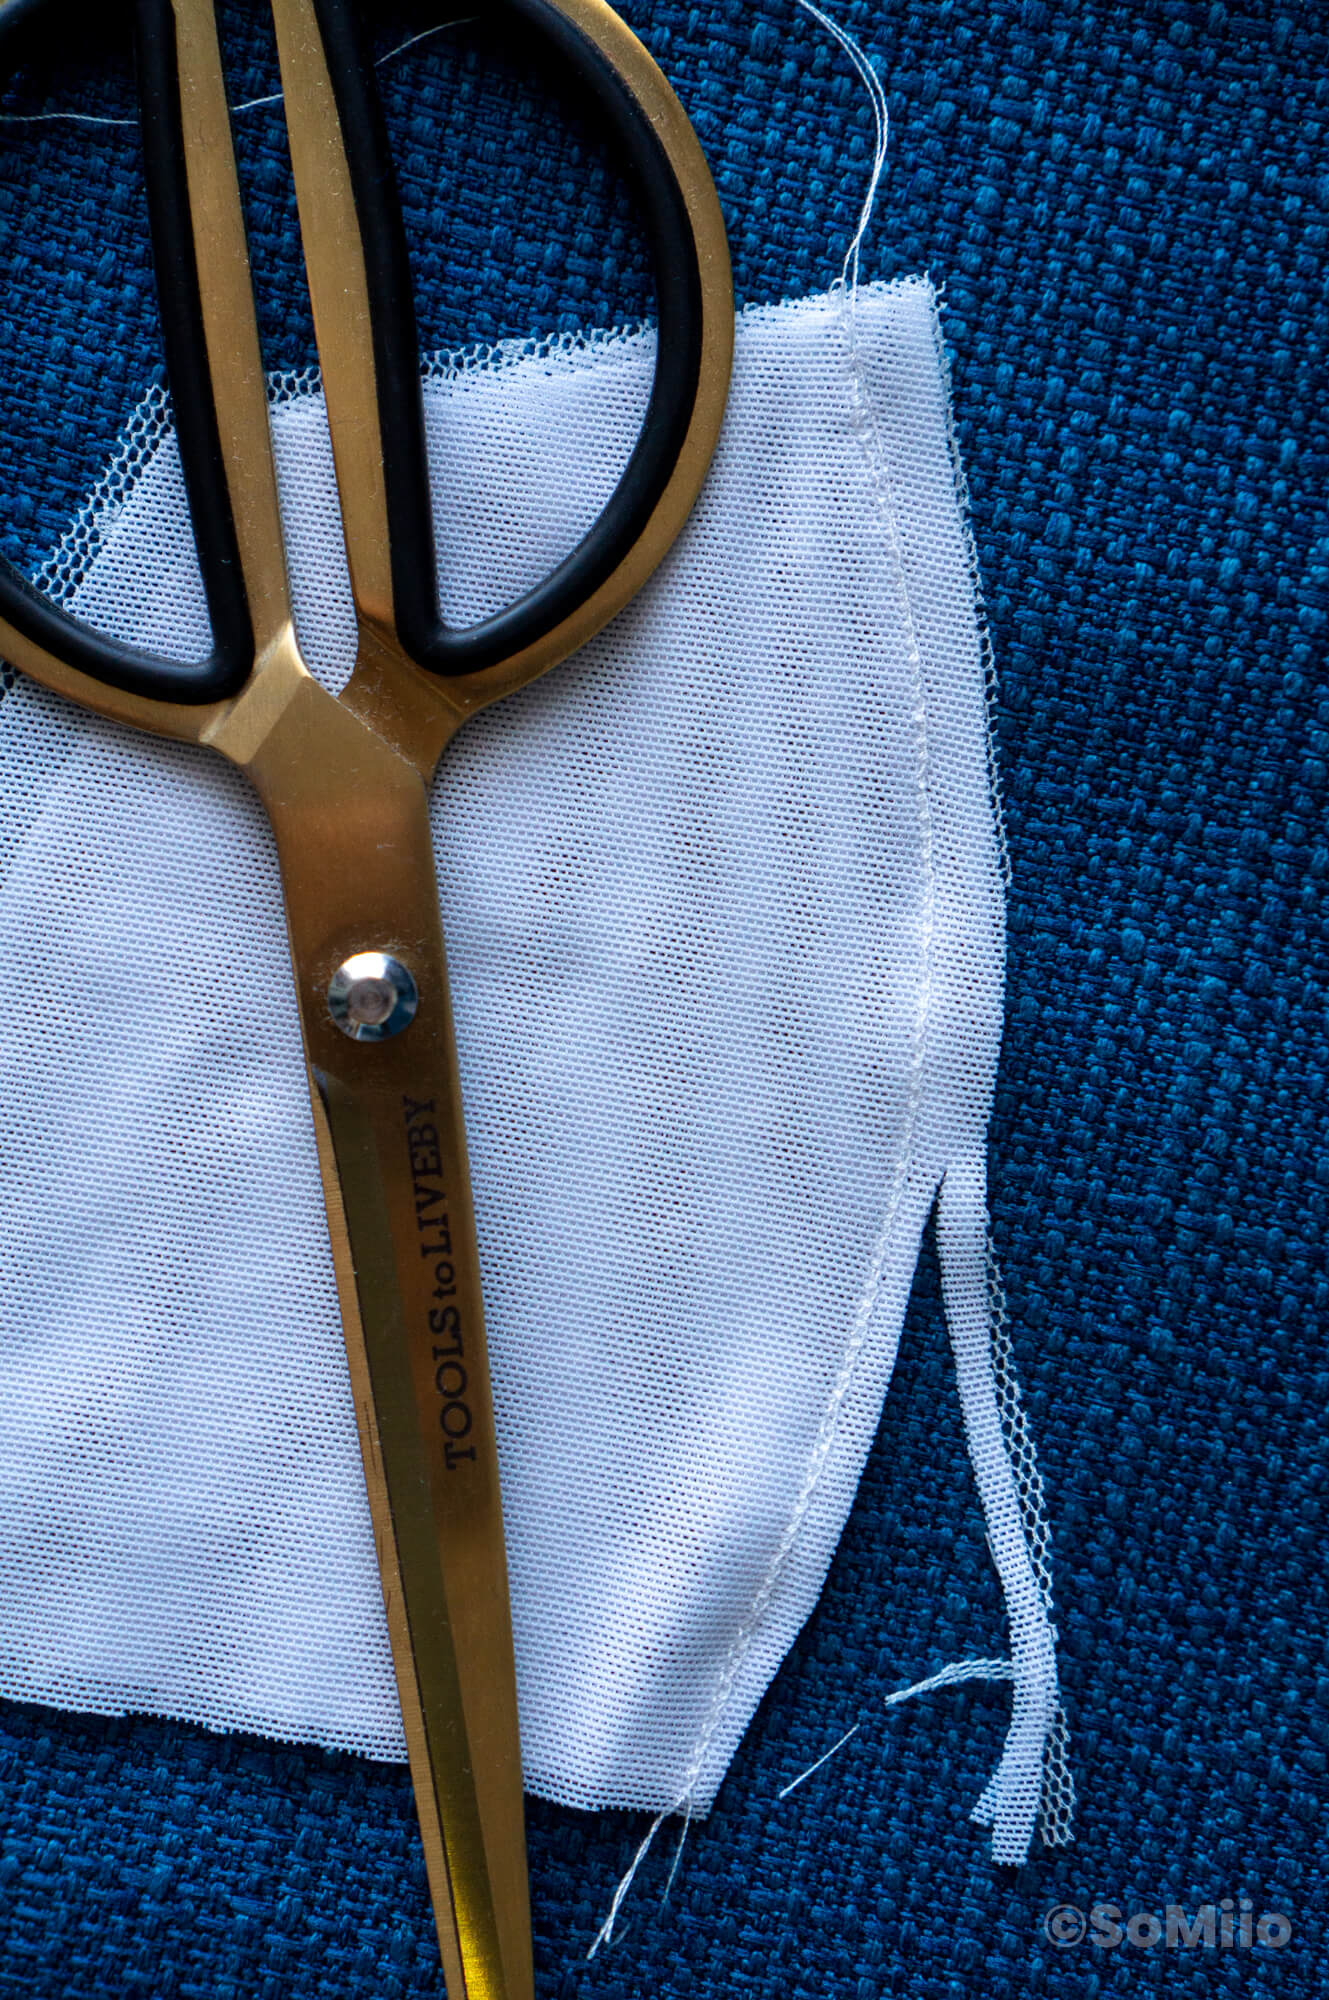
Ensuite, on dégarni un peu les marges de couture avec des ciseaux qui coupent bien et on ouvre la couture délicatement au fer.
Pour finir, une petite surpiqûre. Les demi-bonnets sont prêts pour les élastiques.
Ici, ça devient plus délicat. Il s’agit de calculer la bonne longueur d’élastique à coudre pour le haut du bonnet et les côtés.
Concernant le haut du bonnet, j’ai juste cousu l’élastique pré-plié sans l’étirer.
Au final, je conseillerais de mettre une petite tension car mes bonnets baillent un peu.
Pour les côtés, j’ai mesuré ça sur les pièces de patron d’origine, enlevé 2-3 cm pour tenir compte de l’élasticité… et finalement j’ai cousu plus long au cas où. Puis j’ai re-mesuré sur les pièces d’origine et marqué avec des épingles.
Hum… pas génialement précis comme tutoriel !
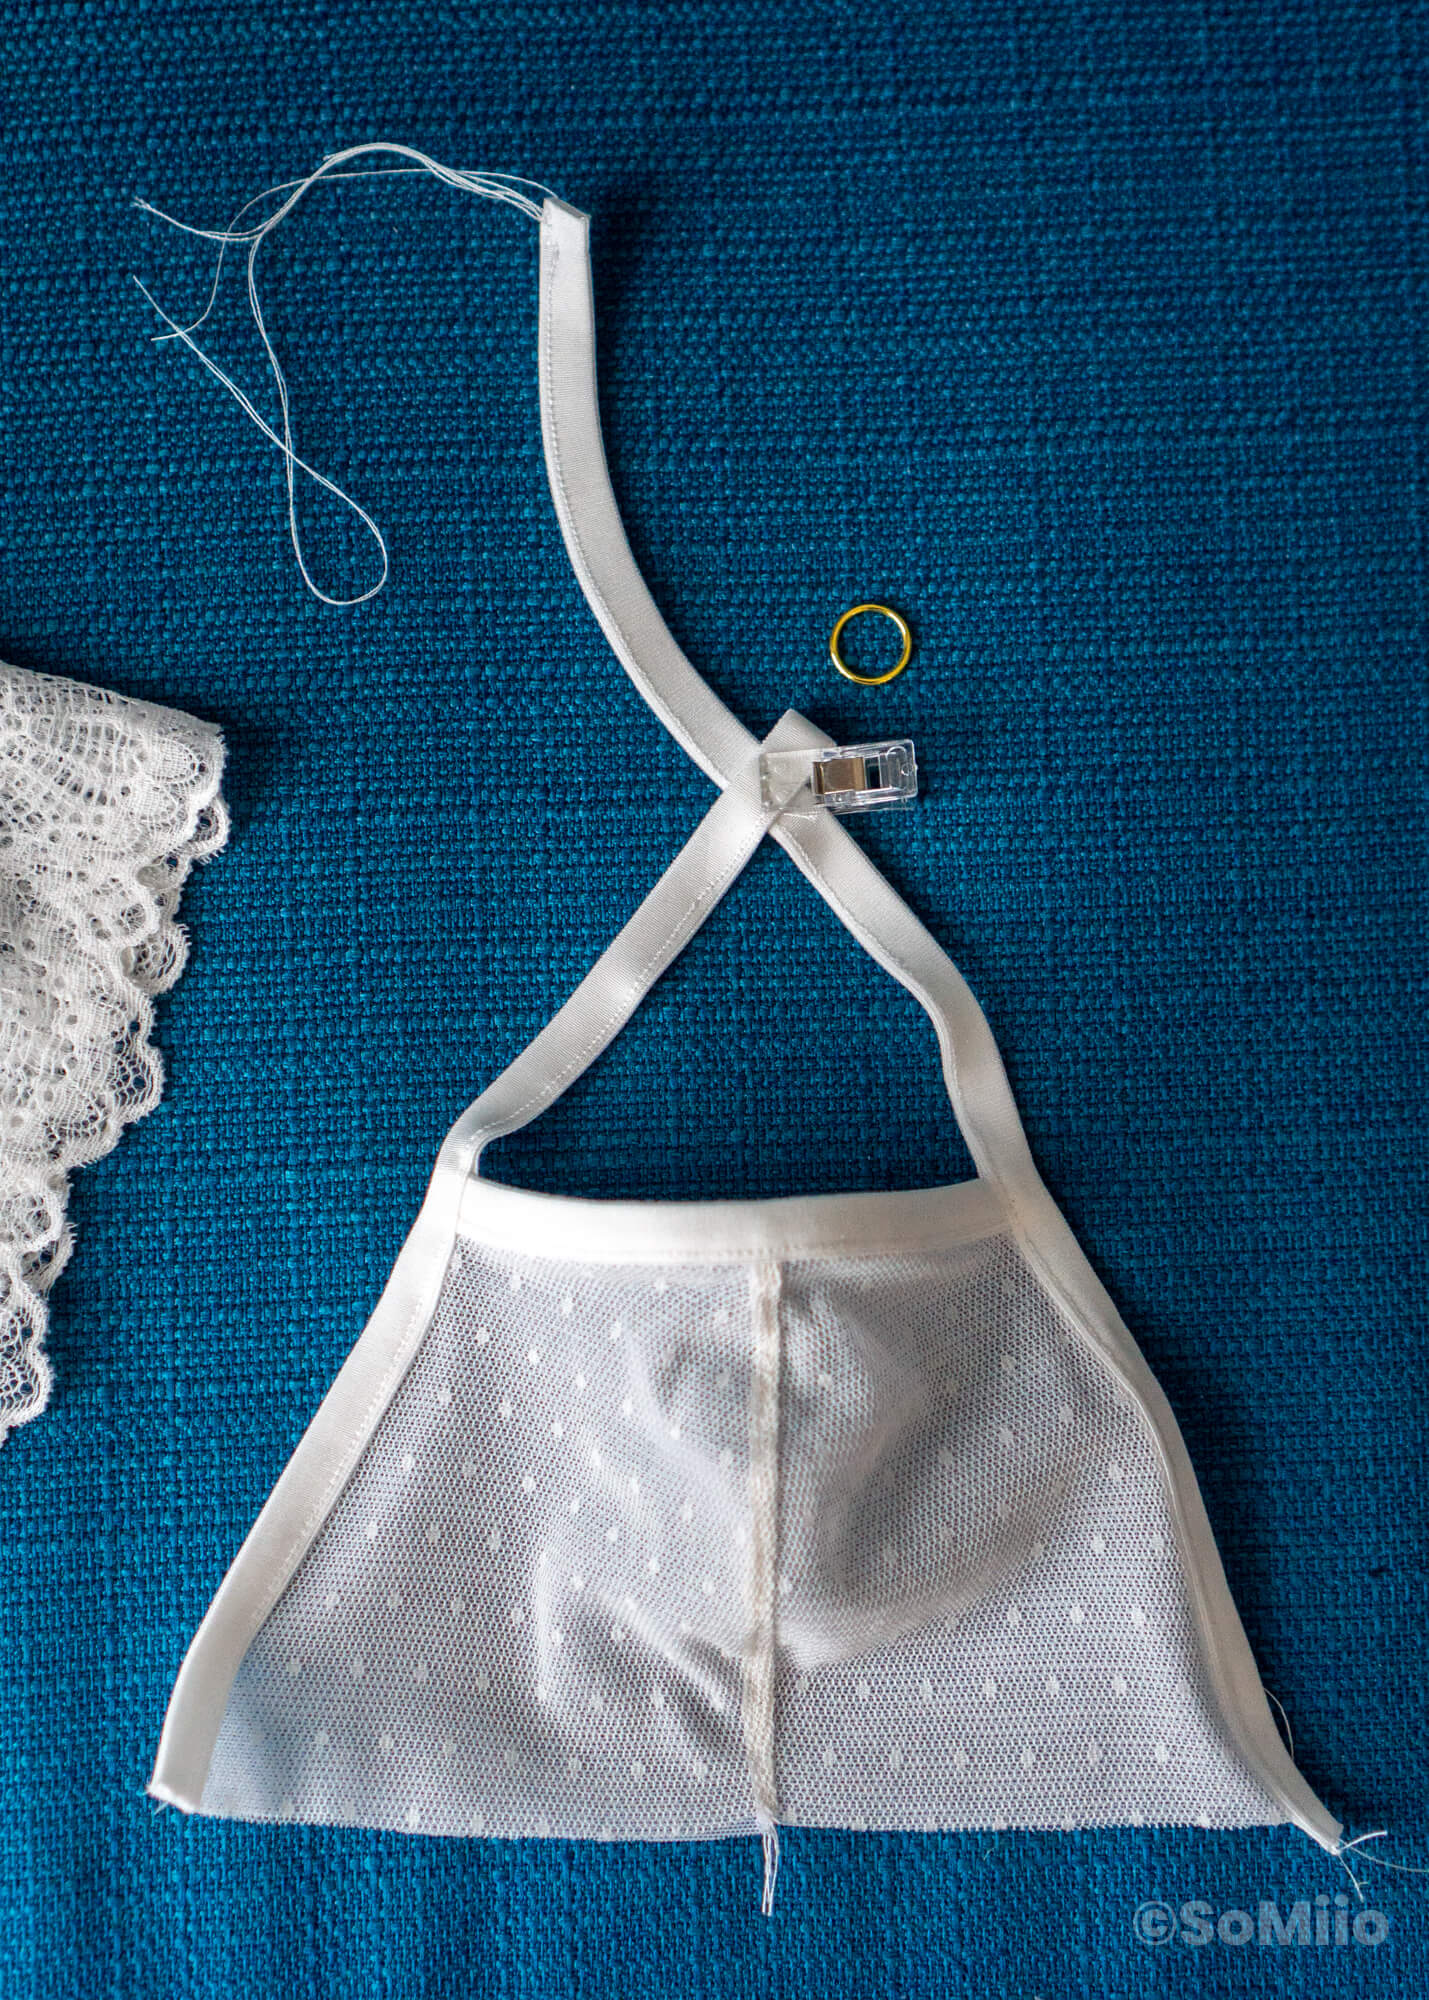
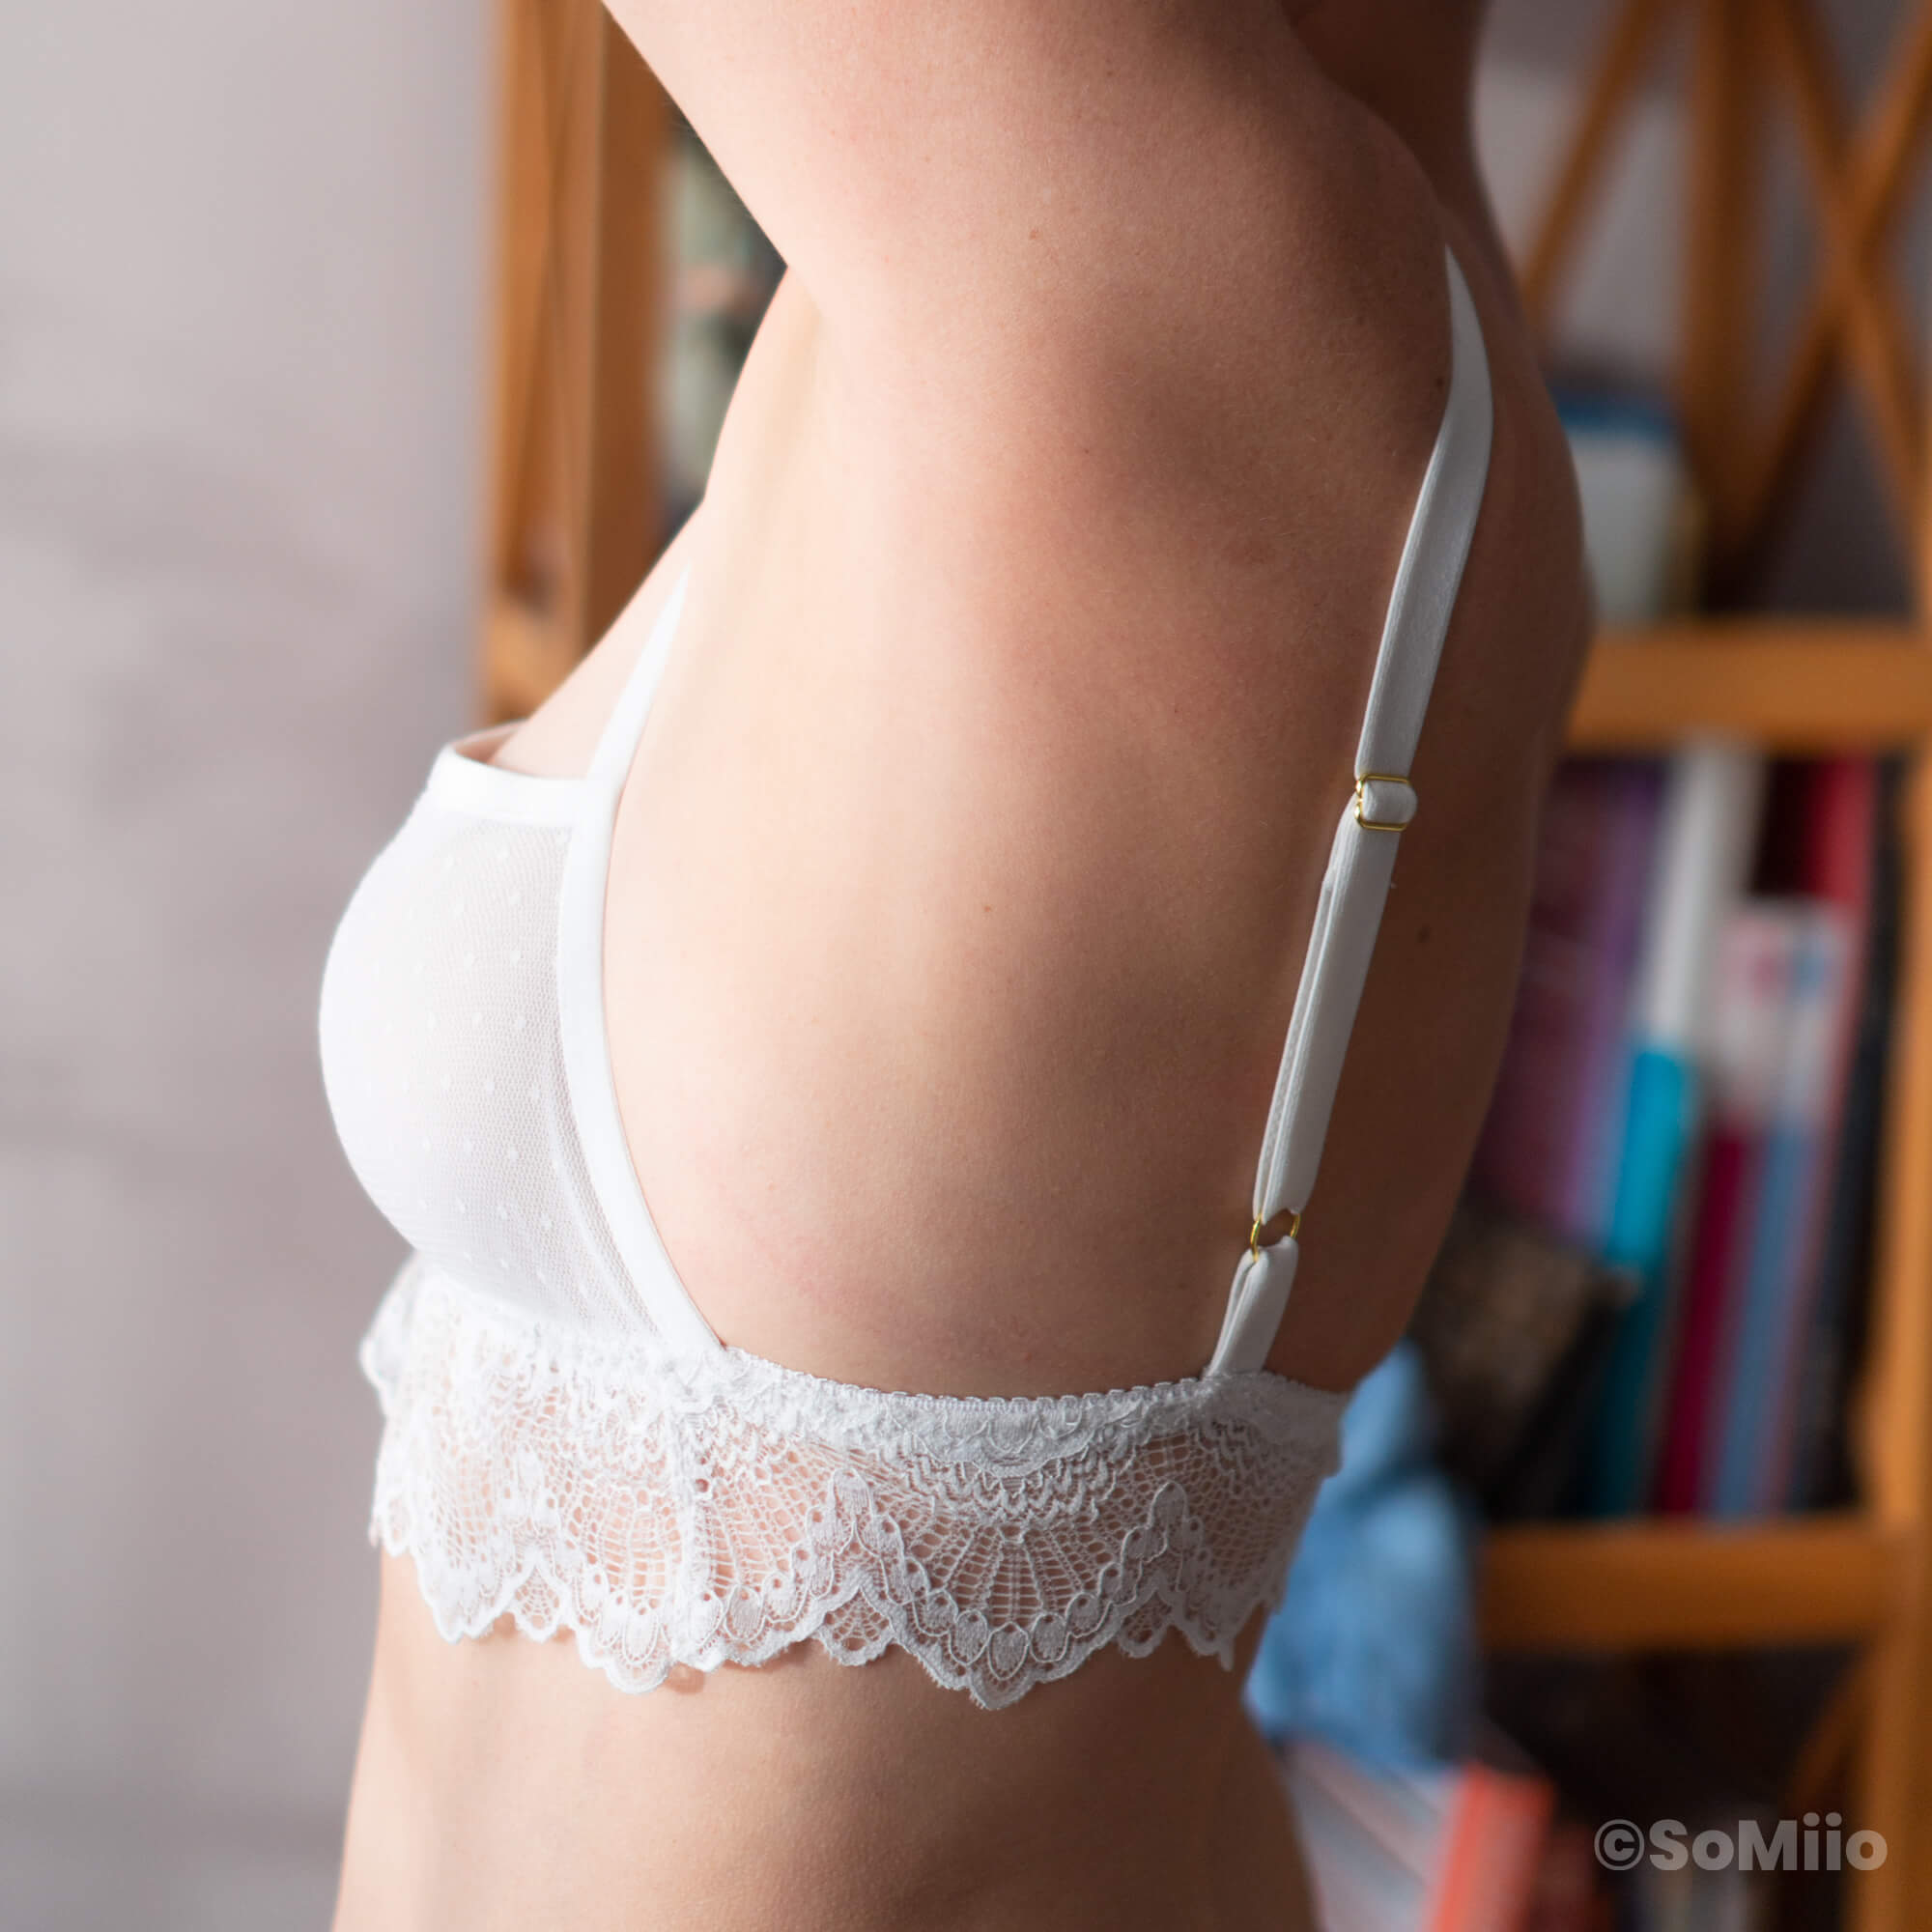
Ci-dessous, c’est le moment où j’ai testé comment et à quelle endroit j’allais replier un élastique sur l’autre pour former la boucle pour glisser l’anneau pour la bretelle.
Ensuite, il suffit de suivre les indications normales du patron.
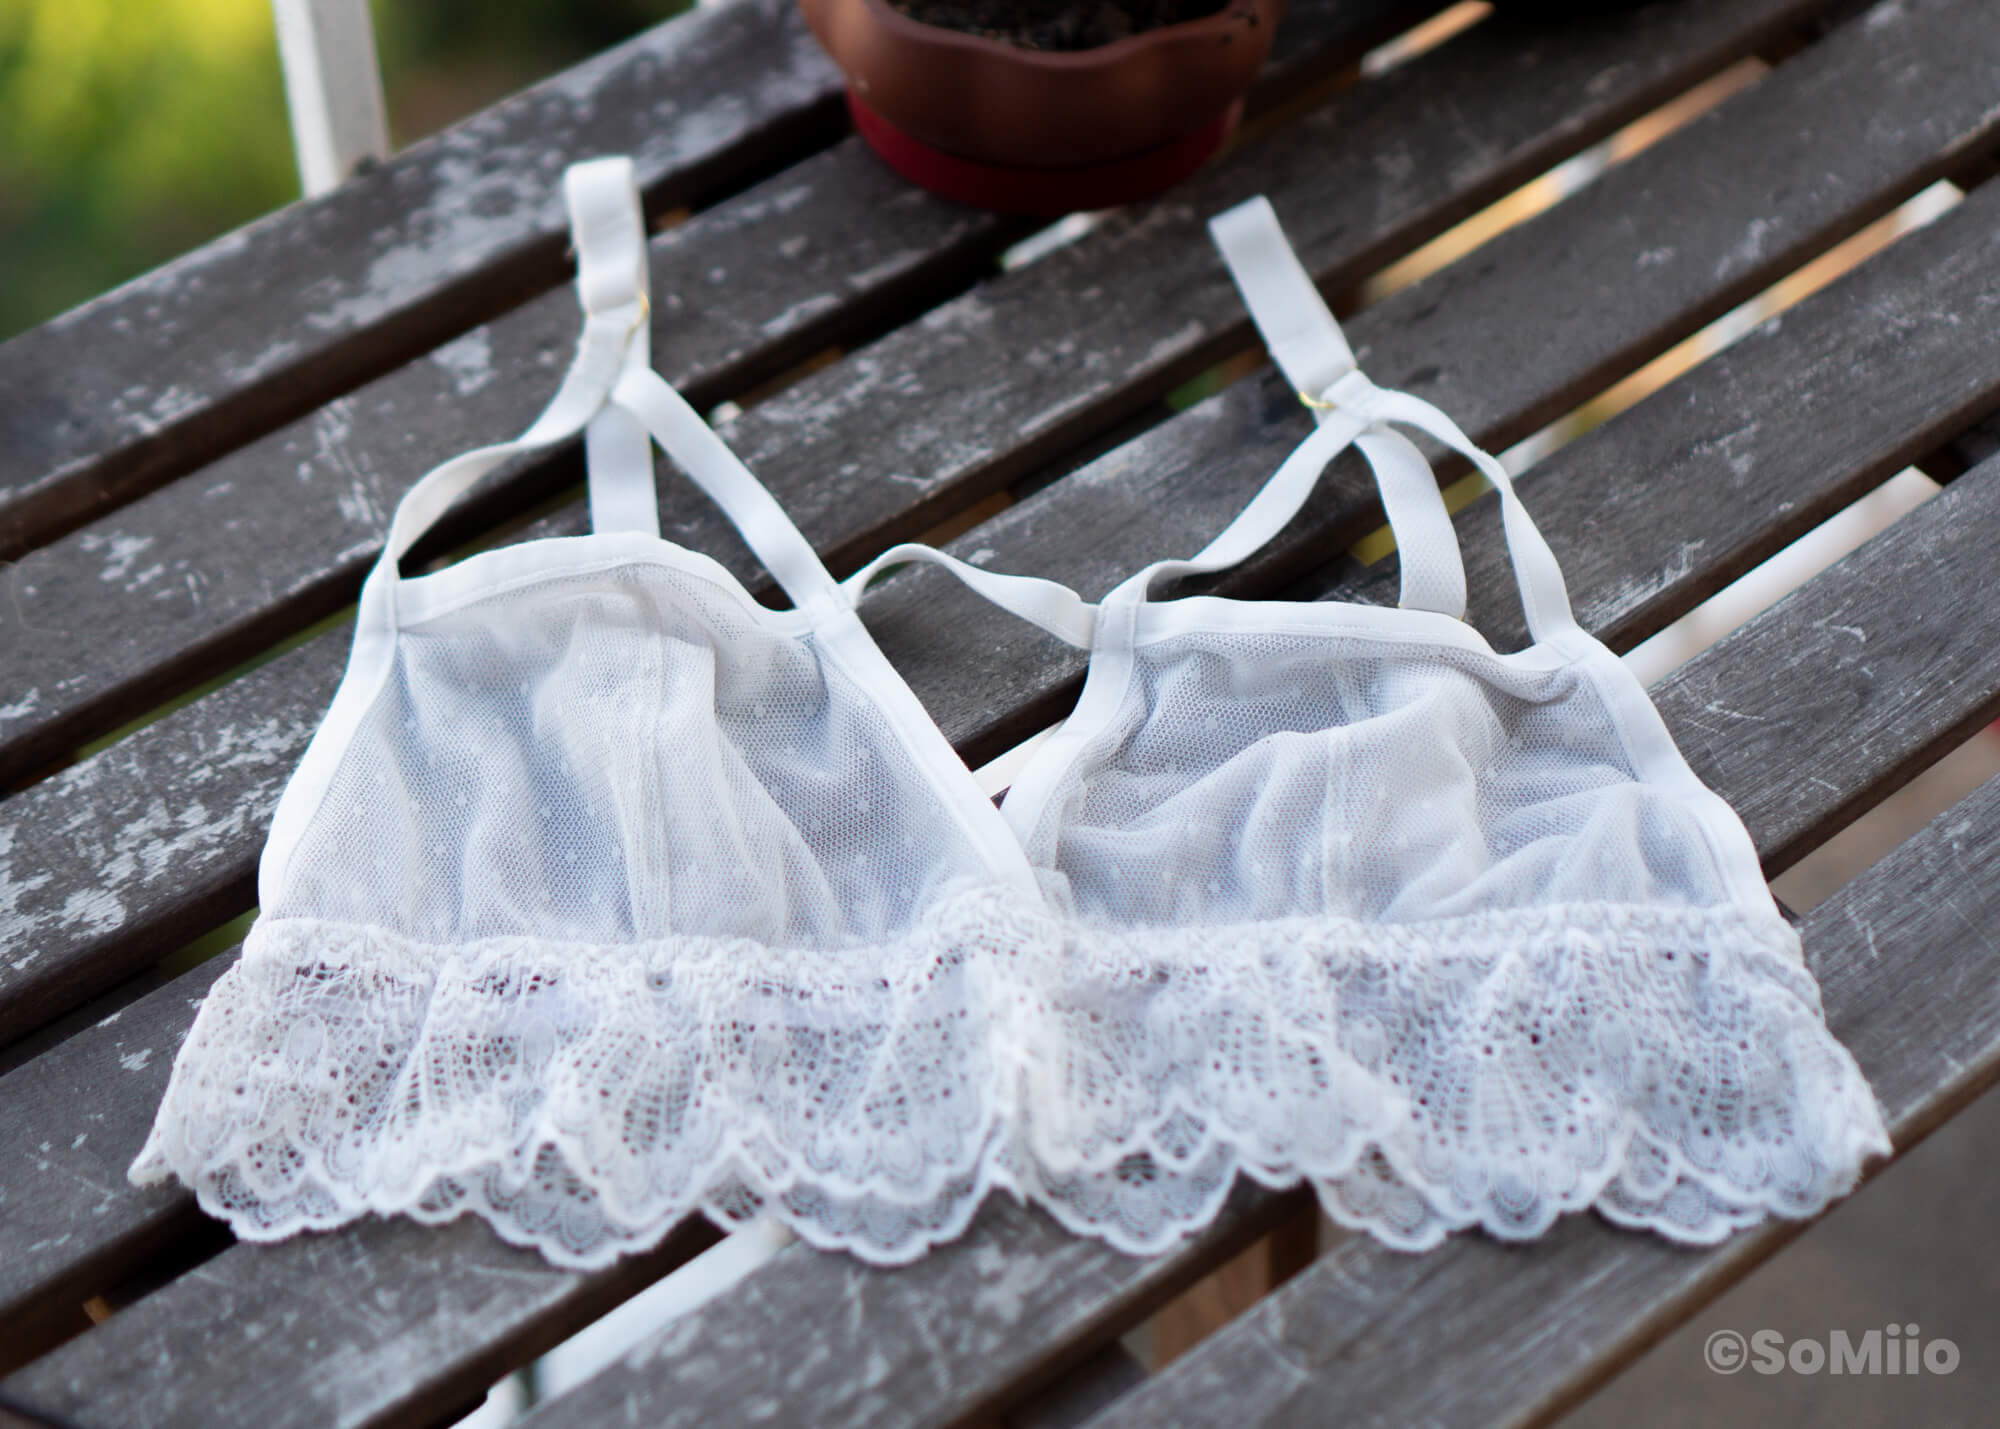
Les photos de lingerie à plat, ça ressemble toujours à un vieux bout de serpillère sur une table ¯_(ツ)_/¯
Après essayage, j’ai constaté quelques gondolages et tensions que j’ai ré-équilibré en ajoutant l’élastique entre les seins. Et c’est finalement parfait puisque je trouve que ça recrée un triangle qui équilibre aussi visuellement la chose.
Et voilà !
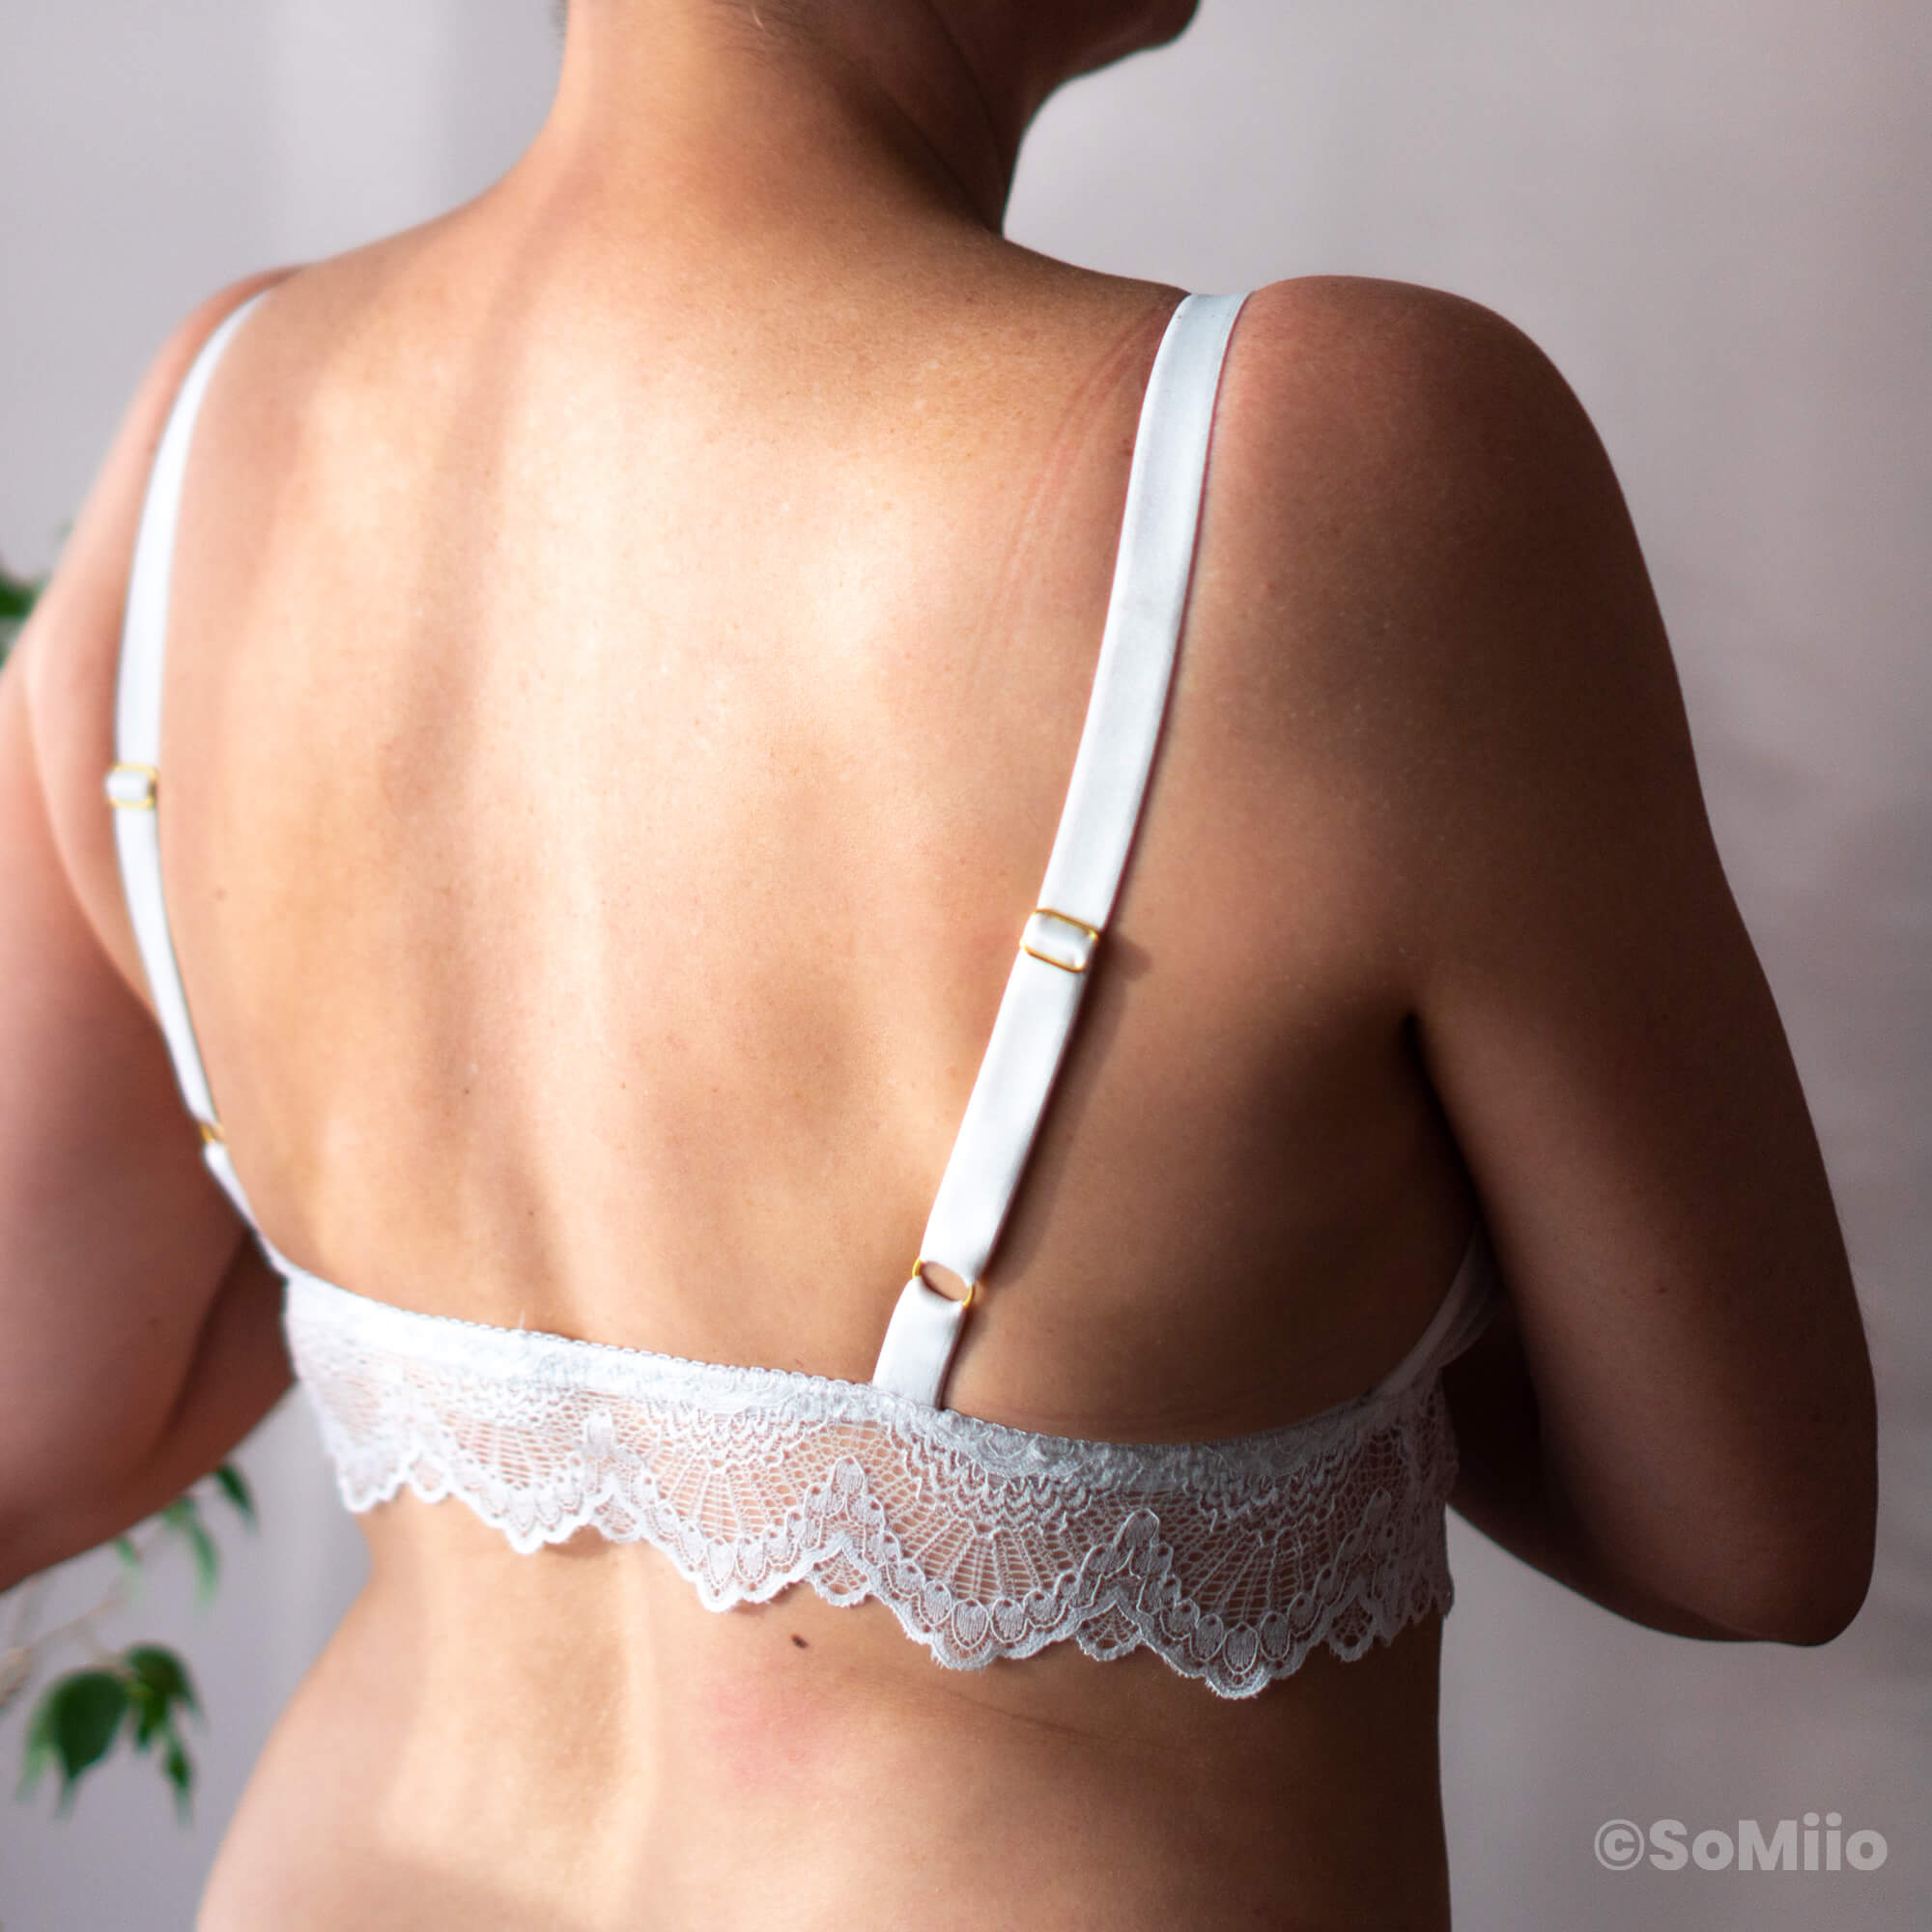
Ci-dessus, on voit où ça baille un peu.
Finalement, j’aurais probablement pu couper la dentelle moins longue car elle gondole un peu. Mais ça passssse.
Ah, il faut quand même que je précise que je n’ai pas suivi la longueur recommandée pour l’élastique de sous-poitrine.
Chez Étoffe Malicieuse, je trouve souvent les élastiques trop serrés pour mon confort.
Conclusion
Pour un essai, je suis assez contente de moi. Cette brassière triangle piratée est totalement portable et confortable. Elle sait se faire oublier tout en faisant son petit effet géométricoriginal.
Il faut que je lui adjoigne une culotte pour en faire un duo de choc… mais je n’ai encore décidé ce que j’allais faire.

Enregistrer sur Pinterest
{:}{:gb}
The advantage of a triangle bra is that it can be modified & hacked very easily…
After my first very conclusive test of the Bohemian triangle bra by Étoffe Malicieuse, I decided to make a radically different version of it to answer week 3 of the #inspirejulychallenge: « Cut-outs » challenge.
| ITEM | SHOP | QUANTITY | PRICE |
| Patron de la brassière Bohème | Étoffe Malicieuse | 1 | 0 € |
| Dotted cream stretch & soft netting | ? | 0,3 m | ? |
| White powernet | Mercerie Extra | 0,4 m | 2 € |
| Cream wide strap elastic | Réserve des Arts | 1 m | 0,5 € |
| Folded elastic | Réserve des Arts | 3 m | 1 € |
| Rings | Aliexpress | 1 m | 0,6 € |
| White band elastic | Evie La Luve | 1 m | 0,5 € |
| Cream stretch lace | Evie La Luve | 0,7 m | 1,50 € |
| Thread | Stock | 0 | 0 € |
| Total | 6,10 € |
Modifying the triangle bra pattern
The Boheme bralette is a triangle bra which is, to this day, the model that fits me best. So I naturally took it as the basis for my hack.
French joke. Sorry.
The idea was to open the cups to leave the upper part open with a small geometric and strappy effect.
The white is to avoid an SM bondage effect.
First of all, to modify the pattern properly, I glued the top of the 2 parts of the cap together with some masking tape.
Be careful to superimpose the stitching lines, ignoring the seam allowance.
Here, the patterns from Étoffe Malicieuse are very handy since the seam allowances lines are printable.
Then, cut, cut, and off you go to cut the pieces from the fabric.
Sewing of the modified bralette
So we have this in terms of pattern pieces:
- a bottom (decorative) band of stretch lace
- 4 cups sides: 2 in polka dot fishnet, 2 in powernet
- 4 middle cups: 2 in polka-dot fishnet, 2 in powernet
I noted on the photo the order of stacking the pieces to obtain a hidden seam, or enclosed seam. #hiddenseamsaremypassion
If you sew them in that order, you open and tadaaa! The seam will be hidden in the middle of the mess and your delicate skin saved from itching. Whew.
Next, the seam allowances are slightly thinned out with scissors that cut well and the seam are gently opened with an iron.
Finally, a bit of topstitching. The half-cups are ready for the elastics.
Here, it gets trickier. It’s a matter of calculating the right length of elastic to sew on the top of the cup and the sides.
Concerning the top of the cup, I just sewed the pre-folded elastic without stretching it.
Finally, I would advise to put a bit of tension because my cups yawn a bit.
For the sides, I measured this on the original pattern pieces, removed 2-3 cm to take into account the elasticity… and finally I sewed longer just in case. Then I re-measured it on the original pattern pieces and marked it with pins.
Hmm… not so accurate as a tutorial!
Below is when I tested how and where I was going to fold one elastic over the other to form the buckle to slide the ring for the shoulder strap.
Then, just follow the normal directions in the pattern.
Lingerie flat pictures always looks like an old piece of mop on a table. ¯_(ツ)_/¯
After fitting, I noticed some gaps and tensions that I re-balanced by adding the elastic between the breasts. And it’s finally perfect since I find that it recreates a triangle that also visually balances the thing.
There you go!
Above, you can see where it’s gaping a little.
I probably could have cut the lace a little shorter because it puckers a bit. But it’s okaaaaay.
Ah, I must point out that I did not follow the recommended length for the underbust band.
With Étoffe Malicieuse patterns, I often find the elastics too tight for my comfort.
Conclusion
For a test, I’m pretty happy with myself. This hacked triangle bra is totally wearable and comfortable. I forget it when I wear it, and it makes its own little geometrical original effect.
I have to add a pair of panties to it to make it into a shock duo… but I haven’t decided what I’m going to do yet.
Save on Pinterest
{:}